Ways to Disable or Turn Off User Account (Access) Control (UAC) in Windows Vista
User Account Control (UAC), or unknowingly mistaken as User Access Control is new security feature in Windows Vista. The main display of UAC is the occasional pop up dialog box asking for user’s permission needed by Windows or for user to enter administrator’s password to perform the operation or run a program especially setup executable, installer or system tools. UAC also affects command prompt (Cmd.exe) with errors such as “The requested operation requires elevation” or “Access Denied” when not running in elevated command prompt with full privileges.
The annoying symptom happens because User Account (Access) Control or UAC forces all processes to run in lower elevation mode with limited privileges. When a program or process requires access to system files, folders or registry hives that only administrator can access, UAC launch a consent prompt to allow user to give approval or enter administrator’s credential to higher elevation with full administrator’s rights.
For user who find the constant UAC elevation approval request annoying, and confident that you can maintain the security of computer from infection without the help of UAC, it’s possible to turn off and disable UAC. Turning User Account Control off potentially fix compatibility issue where UAC prevents some programs, applications, components, processes or games from running properly even if authorization is given to elevate its privileges, as delay in execution as may break certain real-time functions.
There are a few ways that you can use to turn off the UAC, but most home and personal users should find method to disable UAC via Control Panel easiest to do. User Account Access Control, when turned off and disabled., will affect all users on the computer.
Method 1 – Turn Off UAC via Users Accounts Control Panel
- Click Start and then open Control Panel.
- In the Control Panel, click User Accounts and Family Safety.

- Click User Accounts.

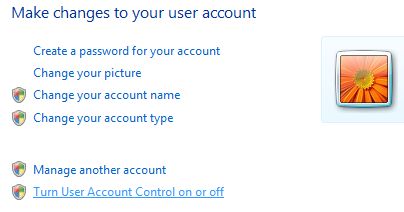
- Click Turn User Account Control on or off.

When prompted that Windows needs your permission to continue, press Continue button or enter the administrator’s password.
- Clear the tick or check mark on the check box beside the option to Use User Account Control (UAC) to help protect your computer.

- Click OK.
- When prompted that computer must be restarted to apply the changes, reboot the computer.
- To enable the UAC, simply tick or select the checkbox again.
Method 2 – Disable UAC Using Registry Editor
- Run Registry Editor by typing RegEdit in Start Search or command prompt.
- Registry Editor, navigate to the following registry key:
HKLM\Software\Microsoft\Windows\CurrentVersion\Policies\System
where HKLM is HKEY_LOCAL_MACHINE.
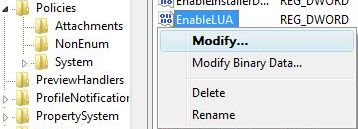
- Right click on EnableLUA registry subkey and choose Modify or double click on EnableLUA registry value name in the right pane to modify the setting.

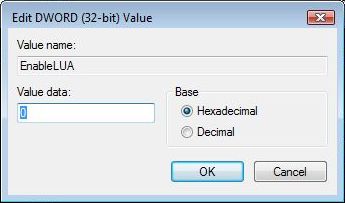
- On “Edit DWORD (32-bit) Value” dialog box, set the new value data as 0.

- Exit from Registry Editor.
- Restart the computer.
- To enable the UAC again, simply change back the value data of EnableLUA to 1.
Method 3 – Turn Off UAC Using MSConfig System Configuration Utility
- Type MSConfig in Start Search box or Run command (open by pressing Win+R) and hit Enter key.
When prompted that Windows needs your permission to continue, press Continue button or enter the administrator’s password.
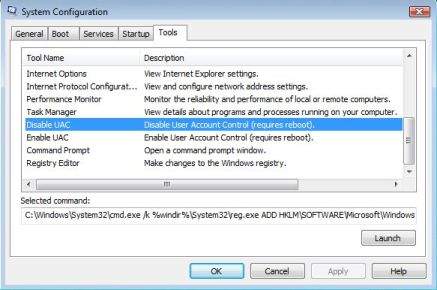
- In System Configuration window, click on the Tools tab.
- Scroll down and locate to select Disable UAP or Disable UAC option in the item list.

- Click the Launch button.
- A command prompt window will open and automatically execute and run scripted process to disable UAC.
- On completion, The operation completed successfully message will be shown. Close Cmd.exe window when done, and then exit form MSConfig.
- Restart computer for changes to apply and become effective.
- To return UAC to on status, simply select Enable UAP or Enable UAC, and then click on Launch button.
Method 4 – Disable UAC Using Group Policy (Active Directory GPO or Local Group Policy)
Note: Windows Vista Home Premium and Home Basic editions do not have Local Group Policy Editor.
- Click Start and then type GPEdit.msc in the Start Search box and hit Enter key to open the Group Policy Editor.
Note: If you’re using Active Directory Domain GPO which controls many computers, open Group Policy Management Console by click on Start, and then type GPMC.msc in the Start Search and hit Enter key from a Windows Vista computer that is a member of the AD domain. In the Group Policy Management Console (GPMC) window, browse to the respective GPO which is linked and enabled to the OU (organization unit) or domain where the Vista computers are located, then edit it.
- Navigate and browse to Computer Configuration -> Windows Settings -> Security Settings -> Local Policies -> Security Options.
- In the right details pane, there are a few User Account Control related policies. Right click each of the following policies and configure or change the value to the new value indicated below after the dash (-):
- User Account Control: Behavior of the elevation prompt for administrators – Elevate without prompting
- User Account Control: Detect application installations and prompt for elevation – Disabled
- User Account Control: Run all administrators in Admin Approval Mode – Disabled

- Restart the computer to make the changes effective.
- To re-turn on UAC, revert back to original values of the policies, which is Enabled and Prompt for Consent.
Method 5 – Disable User Access Control from Command Prompt
- Open an elevated command prompt.
- Run the following command to disable and turn off UAC:
C:\Windows\System32\cmd.exe /k %windir%\System32\reg.exe ADD HKLM\SOFTWARE\Microsoft\Windows\CurrentVersion\Policies\System /v EnableLUA /t REG_DWORD /d 0 /f - To re-enable and turn back on the User Account Control, run the following command:
C:\Windows\System32\cmd.exe /k %windir%\System32\reg.exe ADD HKLM\SOFTWARE\Microsoft\Windows\CurrentVersion\Policies\System /v EnableLUA /t REG_DWORD /d 1 /f - Reboot the computer for the changes to take effect.
Note: After disabling and turning off UAC, a red X shield icon of Windows Security Center will be displayed in the notification area (system tray). My Digital Life has the guide to remove the Windows Security Center warning icon and messages.
Recent Articles
- How To Download HBO Shows On iPhone, iPad Through Apple TV App
- Windows 10 Insider Preview Build 19025 (20H1) for PC Official Available for Insiders in Fast Ring – Here’s What’s News, Fixes, and Enhancement Changelog
- Kaspersky Total Security 2020 Free Download With License Serial Key
- Steganos Privacy Suite 19 Free Download With Genuine License Key
- Zemana AntiMalware Premium Free Download For Limited Time


