How to Disable Windows Vista CD/DVD Disc Burning/Recording Function
Windows Vista has built-in CD and DVD burning or recording feature that allows users to burn the selected files and folders to a CD or DVD disc with a recordable optical drive. However, the burning function supported is pretty basic and users can only burned individual files, images, pictures photos, documents and files to disc as data CD or DVD only. There is no support for CD or DVD disc image handling or burning, nor it’s able to create slide show, audio CD or video CD/DVD.
As a result, a lot of users depends on full feature optical disc software such as Nero. For users who use third-party CD/DVD burning program, the built-in CD and DVD burning capability of Windows Vissta can be disabled or turned off to avoid conflict or interference. When the optical disc burning feature is disabled, the “Burn” button that appears on the Windows Explorer’s toolbar or task pane will be hidden or disappeared.

Burn command on the Windows Vista toolbar, which probably seldom used by many, will be hidden and removed after disable CD/DVD burning feature in Vista.
To disable and turn off CD and DVD burning feature in Vista, follow these steps:
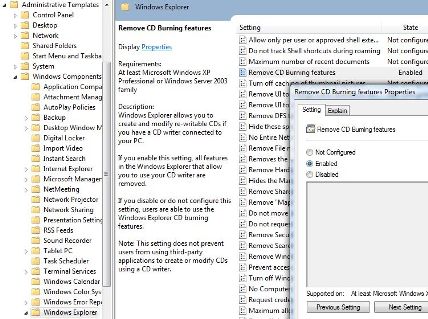
- Run gpedit.msc (Group Policy Editor) from Start Search.
- Expand Local Group Policy, then expand User Configuration, then expand Administrative Templates, and finally expand Windows Components.
- Select Windows Explorer.
- In the right pane, double click on Remove CD burning features.
- Select Enabled radio button to stop and disable all features in the Windows Explorer that allow users to use their CD writer to burn. Click OK when done.

- Restart computer or log off and log on again.
- To reset and re-enable the CD burning feature in Vista, simply choose back the setting to Not Configured or Disabled.
Note that even though you have disable CD/DVD burning feature, it does not prevent users from using third-party applications to create or modify CDs using a CD writer.
If your system doesn’t come with a Group Policy Editor, it’s possible to manually change the CD burning feature support in the registry. To do so, run Registry Editor (regedit), and then navigate to the following registry key:
HKEY_CURRENT_USER\Software\Microsoft\Windows\CurrentVersion\Policies\Explorer
In the right pane, if it’s not already existed, right click on a blank space, and select New to create a new 32-bit DWORD value. Name the new value name as NoCDBurning, and assign its value data to 1.
![]()
To reset and turn back on CD burning feature, delete the NoCDBurning value, or set its value data to 0.
Alternatively, simply download the DisableEnableCDBurning.zip .ZIP archive, which contains two registry files – EnableCDBurning.reg and DisableCDBurning.reg. Simply double click on DisableCDBurning.reg to merge its value to registry to remove CD burning feature, or double click on EnableCDBurning.reg to restore the CD burning feature.
Whichever way you choose, remember to restart computer or logout and login again for the change to take effect.
Recent Articles
- How To Download HBO Shows On iPhone, iPad Through Apple TV App
- Windows 10 Insider Preview Build 19025 (20H1) for PC Official Available for Insiders in Fast Ring – Here’s What’s News, Fixes, and Enhancement Changelog
- Kaspersky Total Security 2020 Free Download With License Serial Key
- Steganos Privacy Suite 19 Free Download With Genuine License Key
- Zemana AntiMalware Premium Free Download For Limited Time


