How to Use USB or FireWire Portable External Hard Drive to Install Windows Vista Without DVD Drive
A lot of computer newly purchased no longer come with Windows Vista installation DVD disc. Users can create a set of recovery discs manually, but the recovery process doesn’t provide a way to clean install Windows Vista. Many PC users resort to download Windows Vista DVD disc image from Internet, which have to be burned to a blank DVD disk to use as setup DVD. For PC users without a DVD burner, or don’t want to waste a DVD just to install Windows Vista, use the following hack to install Windows Vista by using USB or FireWire connected portable or external hard disk drive.
The hack allows users to place the Windows Vista installation files on the external portable hard disk drive which connected via USB port or FireWire port to computer, and then use the external hard disk drive to boot up the computer as if it’s Windows Vista setup DVD to install Windows Vista. Installation of Windows Vista via external USB hard disk is no different from install from a DVD. Here’s the trick to do the task.
- Prepare a external or portable hard disk, or a partition on the external hard drive that has enough space to hold all Windows Vista installation files, which can as big as 4 to 5 GBs.
- In Windows XP or Vista, go to Control Panel -> Administrator Tools (under System and Maintenance in Windows Vista), and open Computer Management.
- Click on Disk Management under tree branch of Storage.
- Right click on the chosen disk or partition (volume) to put Windows Vista installation files, and then select Mark Partition as Active.
- Use image manipulation tool such as Daemon Tools and ISOBuster to extract the contents of Windows Vista DVD image (if the DVD image is in ISO format, you can also use WinRAR to unpack the contents), and copy all files on the DVD to the allocated partition or hard disk.
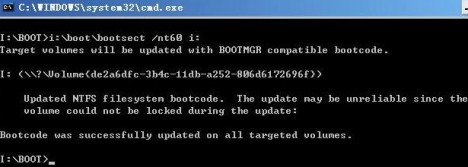
- Open a command prompt window (Cmd), and run the following command:
X:\boot\bootsect /nt60 X:where “X” represents the drive letter of the partition or external hard disk drive, and should be replaced accordingly. The command will make the portable hard disk drive becomes a bootable partition.
- Restart computer and go to the BIOS configuration on computer initial startup. In the CMOS setting, configure the first boot device to USB or FireWire (if supported), depending your which port connection the external disk is using. Note that if your computer doesn’t support boot up via USB or FireWire disk, then the trick will not work.
- Save the BIOS settings to CMOS, restart the computer to boot up via external drive, and start installing Windows Vista.
Recent Articles
- How To Download HBO Shows On iPhone, iPad Through Apple TV App
- Windows 10 Insider Preview Build 19025 (20H1) for PC Official Available for Insiders in Fast Ring – Here’s What’s News, Fixes, and Enhancement Changelog
- Kaspersky Total Security 2020 Free Download With License Serial Key
- Steganos Privacy Suite 19 Free Download With Genuine License Key
- Zemana AntiMalware Premium Free Download For Limited Time


